Chapter 4 How to Use This Textbook
Before we move onto the actual coding part, let’s talk about how to navigate and utilize this textbook.
1. Reading and Active Engagement
This textbook encourages active learning. Don’t merely read through the content—interact with it. Type out the code in your R environment and see the results firsthand. This hands-on approach will solidify your comprehension and enhance your practical skills. Observe how the code behaves, experiment with modifications, and observe how changes impact the outcomes.
2. Curiosity and Inquisitiveness
When you encounter code you don’t fully understand or want to know the underlying process, lean into your curiosity. Don’t hesitate to ask “Why?” and explore concepts beyond the immediate scope. Seek to understand the “why” and “how” alongside the “what.”
3. Resources and Further Explanation
This textbook is a stepping stone to your R journey. Beyond the content provided, explore the references, suggested readings, and online resources mentioned throughout the chapters. Embrace a curious attitude and continue to expand your knowledge by delving into more advanced topics or specific applications that align with your interests.
4. Discussion and Collaboration
If you’re using this textbook as part of a class or a group, engage in discussions with your peers. Sharing insights, clarifying doubts, and collaborating on exercises can enhance your learning experience. Don’t hesitate to ask questions, seek help, and contribute to a supportive learning environment.
4.1 Useful Features
4.1.1 Searching the Textbook
By clicking on the magnifying glass icon in the top left corner, you have the ability to search for keywords across the entire textbook without worrying about case sensitivity. For instance, entering “tidyverse” will display all chapters where tidyverse is mentioned. This gives you a glimpse into future chapters, offering a preview of the various ways you’ll be engaging with tidyverse later on!
4.1.2 Original R Markdown of the Textbook Chapters
This textbook is assembled from individual Rmd files, each representing a chapter. As you progress through the chapters, you may wish to examine the associated Rmd files to delve deeper into the code and its execution.
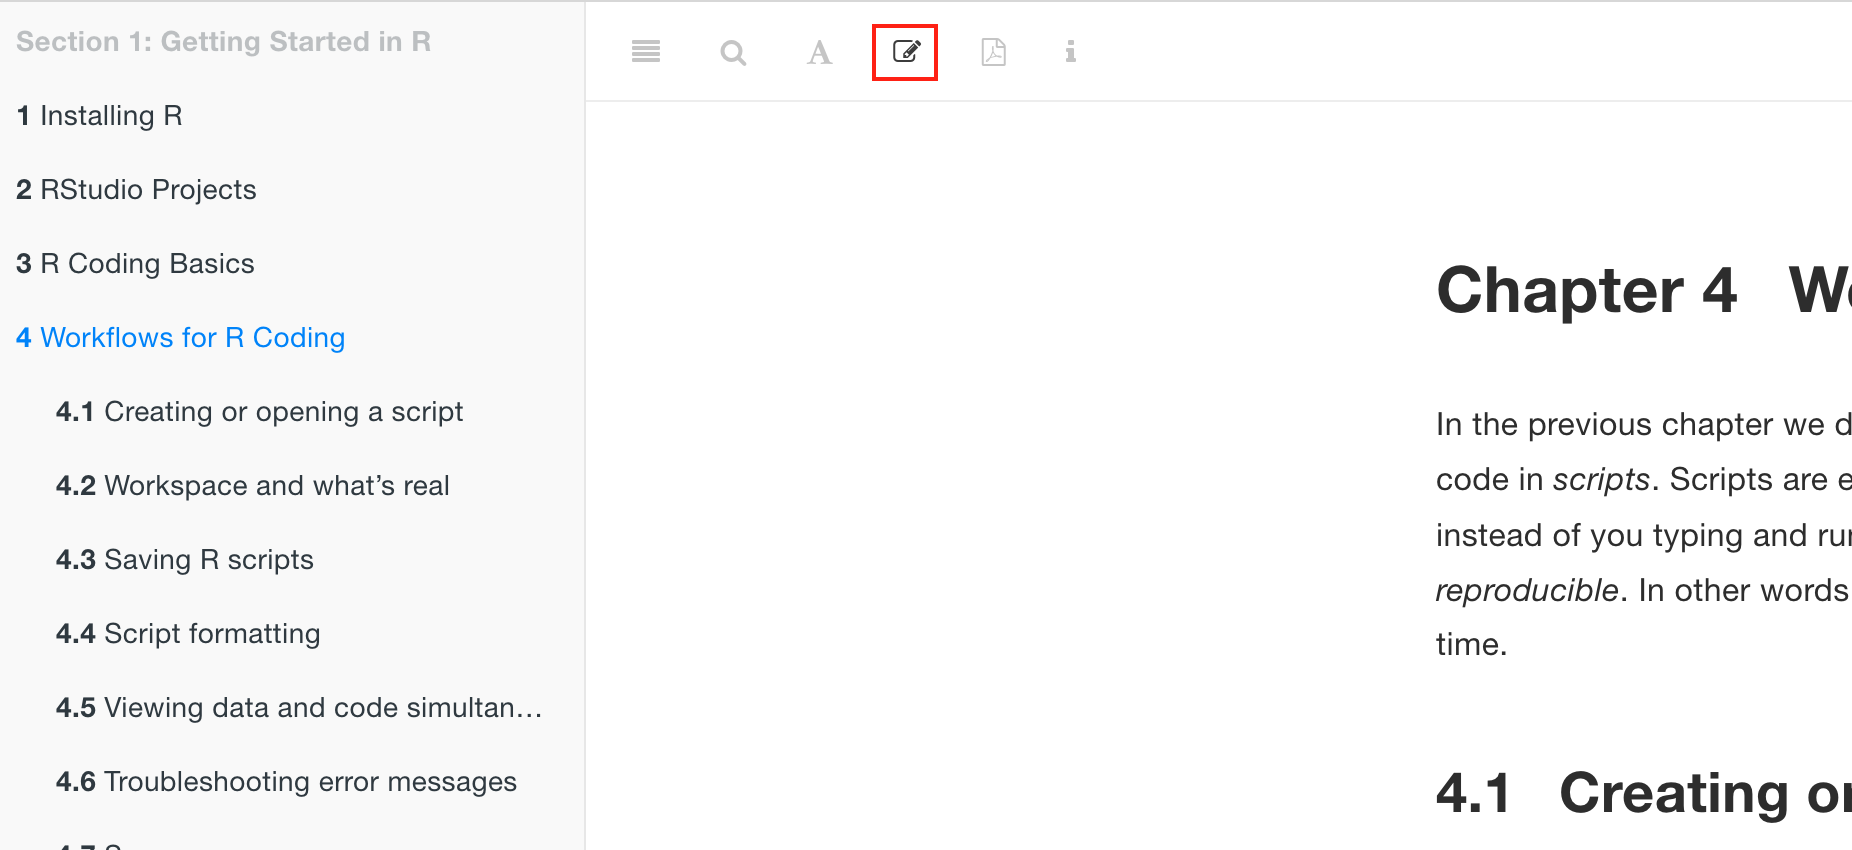
Simply click on the edit icon in the top left corner to be directed to the corresponding Rmd file on GitHub, opened in a new tab. You’re encouraged to download these files, experiment with the code, and observe our Rmd formatting techniques!
4.2 End-of-Chapter Exercises
As you progress through each chapter, you’ll find .Rmd (R Markdown) files available for practice and reinforcement. These Rmd files are designed to provide you with hands-on exercises that align with the concepts covered in the textbook.
Within each Rmd file, you’ll encounter straightforward exercises that give you the opportunity to apply what you’ve learned in each chapter. After completing an exercise, you can run the provided unit test cell to check your answers and receive instant feedback.
Here is an instruction to how to start on the exercises:
- Access the Repository:
- Recommended for those who have access to UofT JupyterHub: Click on the following link to automatically clone the “R4EnvChem-Exercises” repository to your UofT JupyterHub: R4EnvChem-Exercises Repository. This is a preferred method for anyone completing exercises as part of a UofT course.
- Alternatively, you can directly download the files from this repository.
- Work on the Exercise:
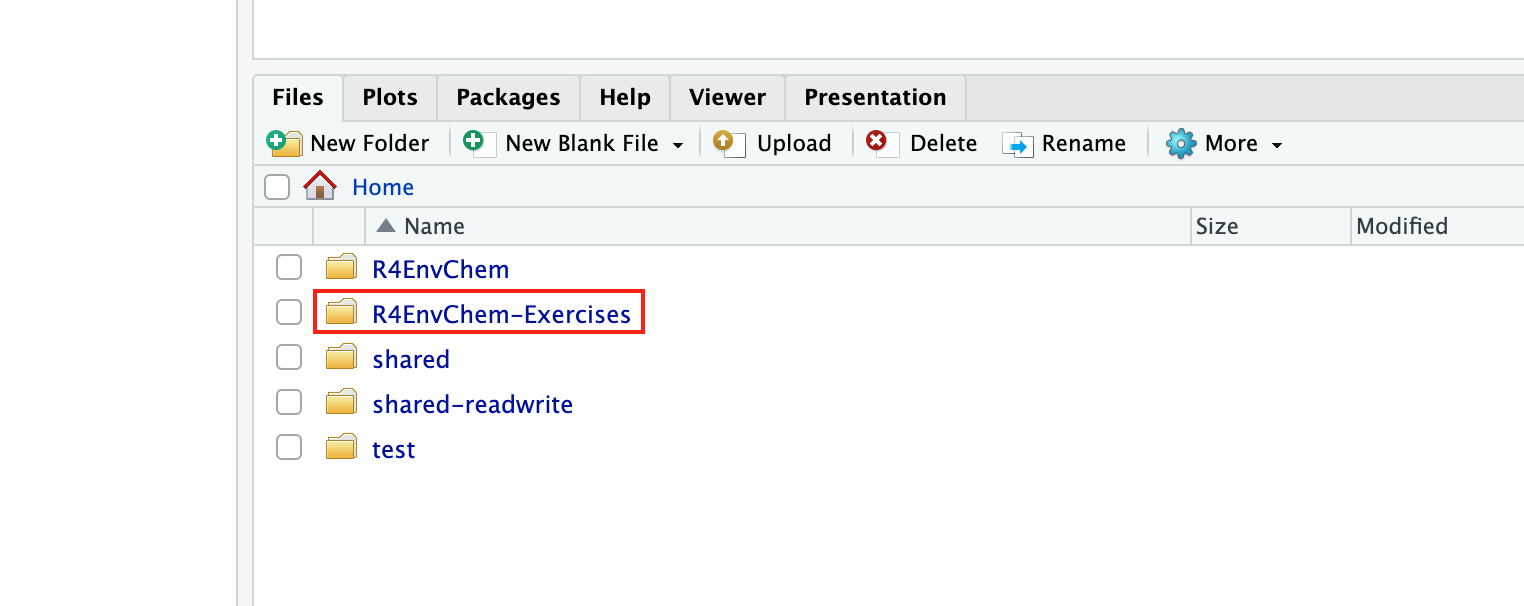
- Once inside your JupyterHub’s RStudio environment, in the “Files” pane you’ll see “R4EnvChem-Exercises” folder (figure below). If you click into this folder, you will see a list of chapter folders. Each chapter folder contains the respective exercise Rmd files. Navigate to the desired chapter’s folder and click on the exercise Rmd file you wish to work on. This will open the file in the RStudio editor.
- Once the Rmd file is open, you can edit, run code chunks, and add your solutions directly in the file. Remember to save your progress regularly. If you want to generate an output document (like a PDF or HTML) to view your results, click on the “Knit” button usually located at the top of the script editor.
- To enhance readability, you optionally click on the
Visualtab at the top of the file view and work on the exercises.
- Once inside your JupyterHub’s RStudio environment, in the “Files” pane you’ll see “R4EnvChem-Exercises” folder (figure below). If you click into this folder, you will see a list of chapter folders. Each chapter folder contains the respective exercise Rmd files. Navigate to the desired chapter’s folder and click on the exercise Rmd file you wish to work on. This will open the file in the RStudio editor.
4.2.1 Optional Extra Questions
For those seeking an additional challenge and a chance to delve into topics beyond the textbook, we offer optional extra questions. Resources and explanations will be provided to support you in tackling these optional questions.
By engaging with these interactive Rmd files, you can actively reinforce your learning, gain practical experience, and explore R concepts in depth. We encourage you to make the most of these resources to enhance your R proficiency. Happy learning!
4.3 Running Tests for Your Exercises
Each chapter’s exercise folder also contains an R test file (e.g., chapterX_tests.R). This file includes unit tests to verify the correctness of your solutions.
4.3.1 How to Run the Tests
Complete the Exercises:
- Work through the exercises in the Rmd file that you encountered in Using R Markdown, adding your solutions to the code chunks, and save your progress. You can save the progress by choosing “File” from the top menu and then clicking on “Save” or by using the keyboard shortcut
Ctrl + S(Windows/Linux) orCmd + S(Mac) for the current Rmd file.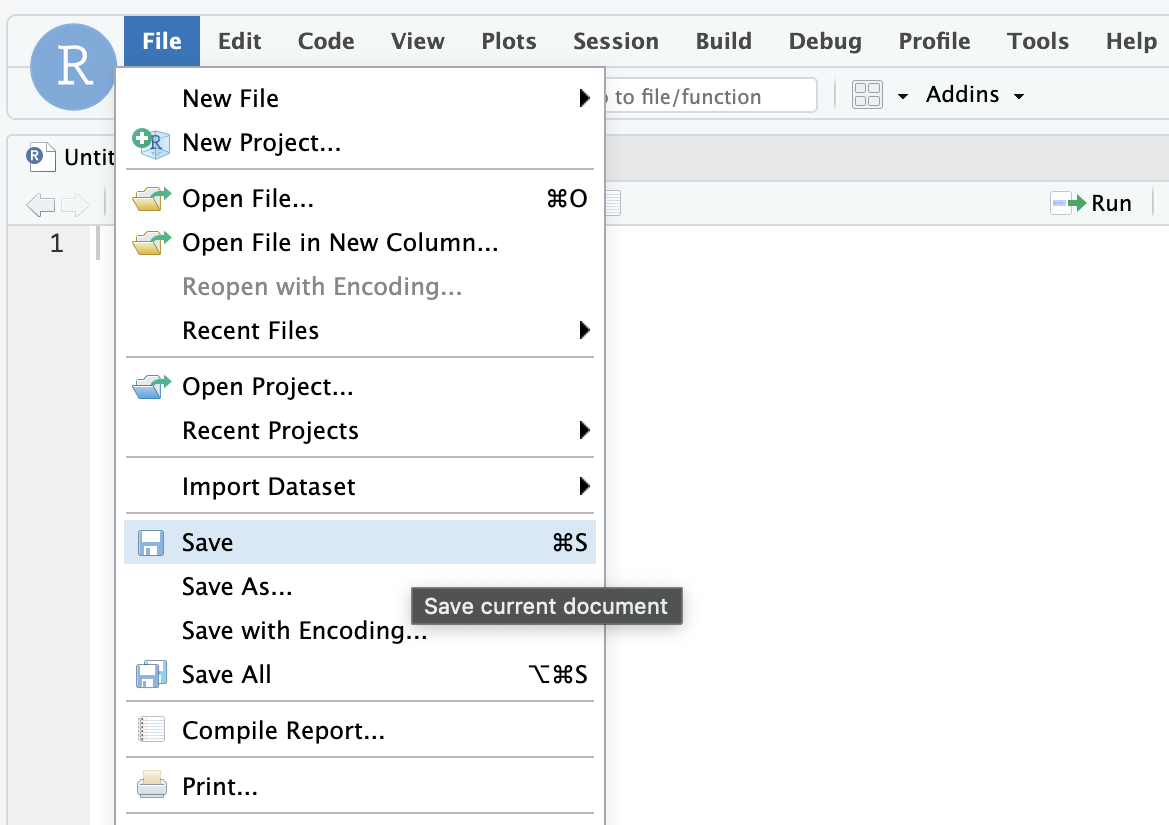
- Work through the exercises in the Rmd file that you encountered in Using R Markdown, adding your solutions to the code chunks, and save your progress. You can save the progress by choosing “File” from the top menu and then clicking on “Save” or by using the keyboard shortcut
Set the Working Directory:
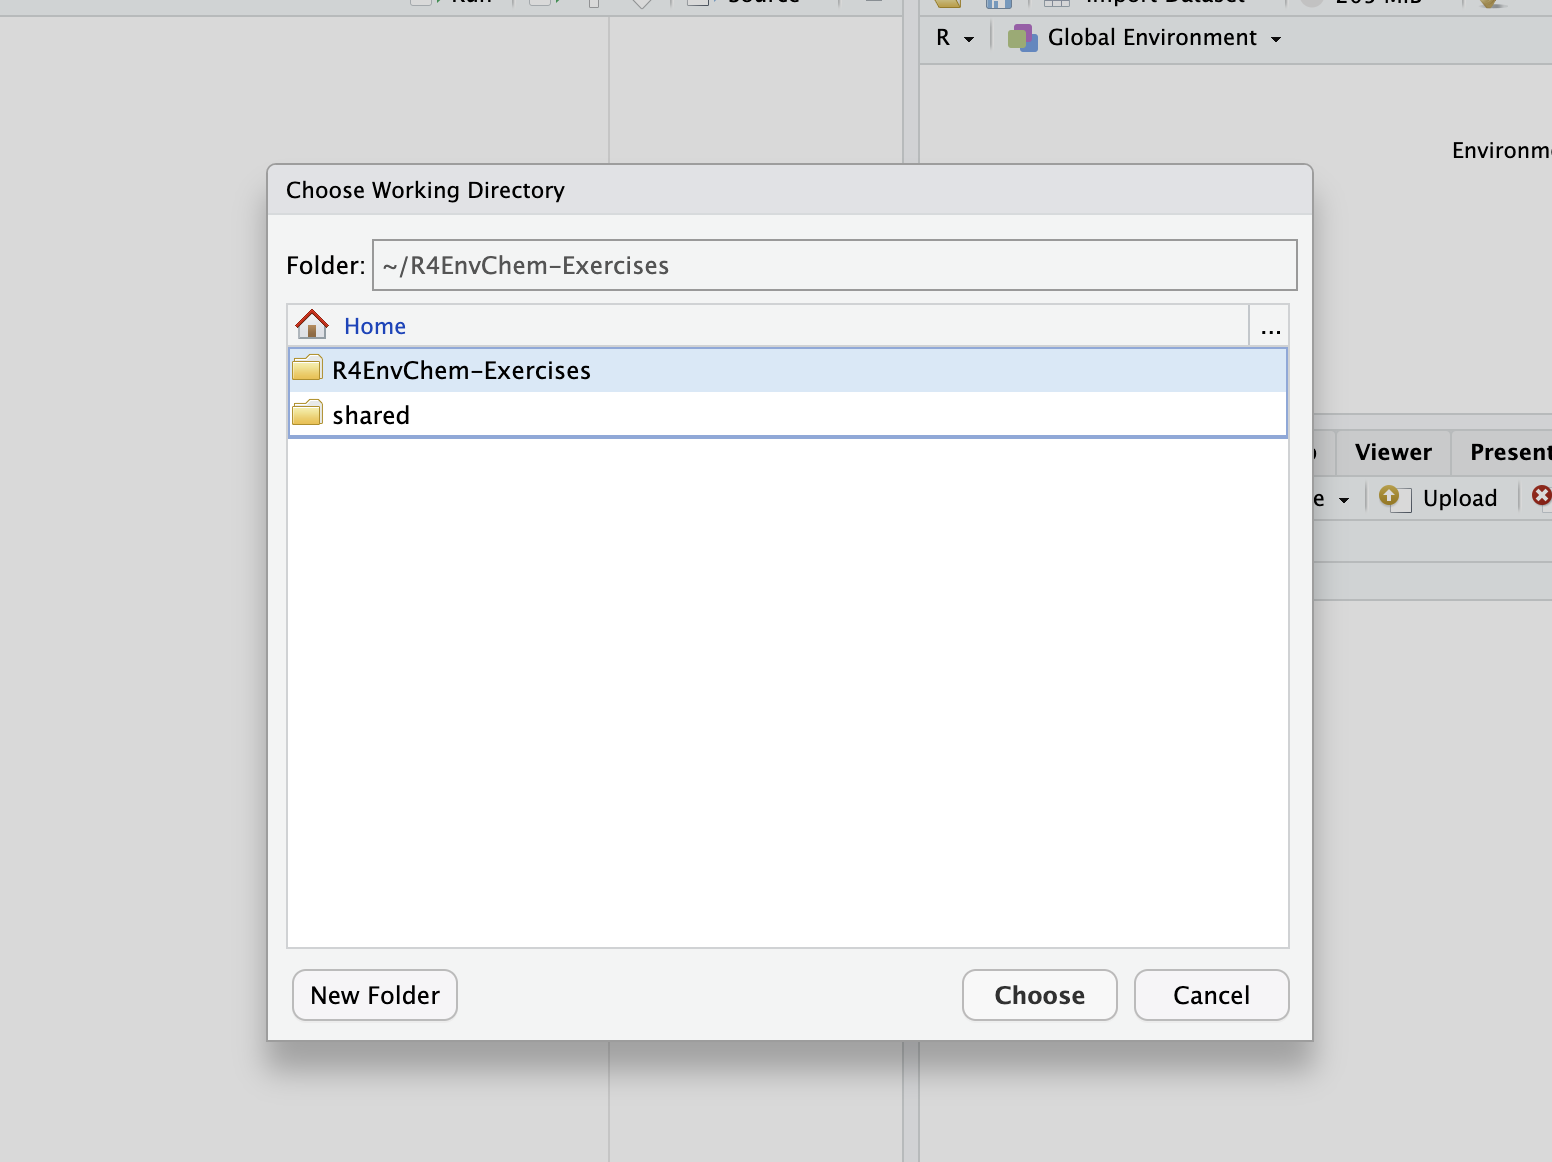
- Whether you are working on the exercises in the UofT JupyterHub or on your local machine, set the working directory to the folder containing your exercise files. To do this in RStudio, choose “Session” from the top menu, click on “Set Working Directory,” and then select “Choose Directory.”
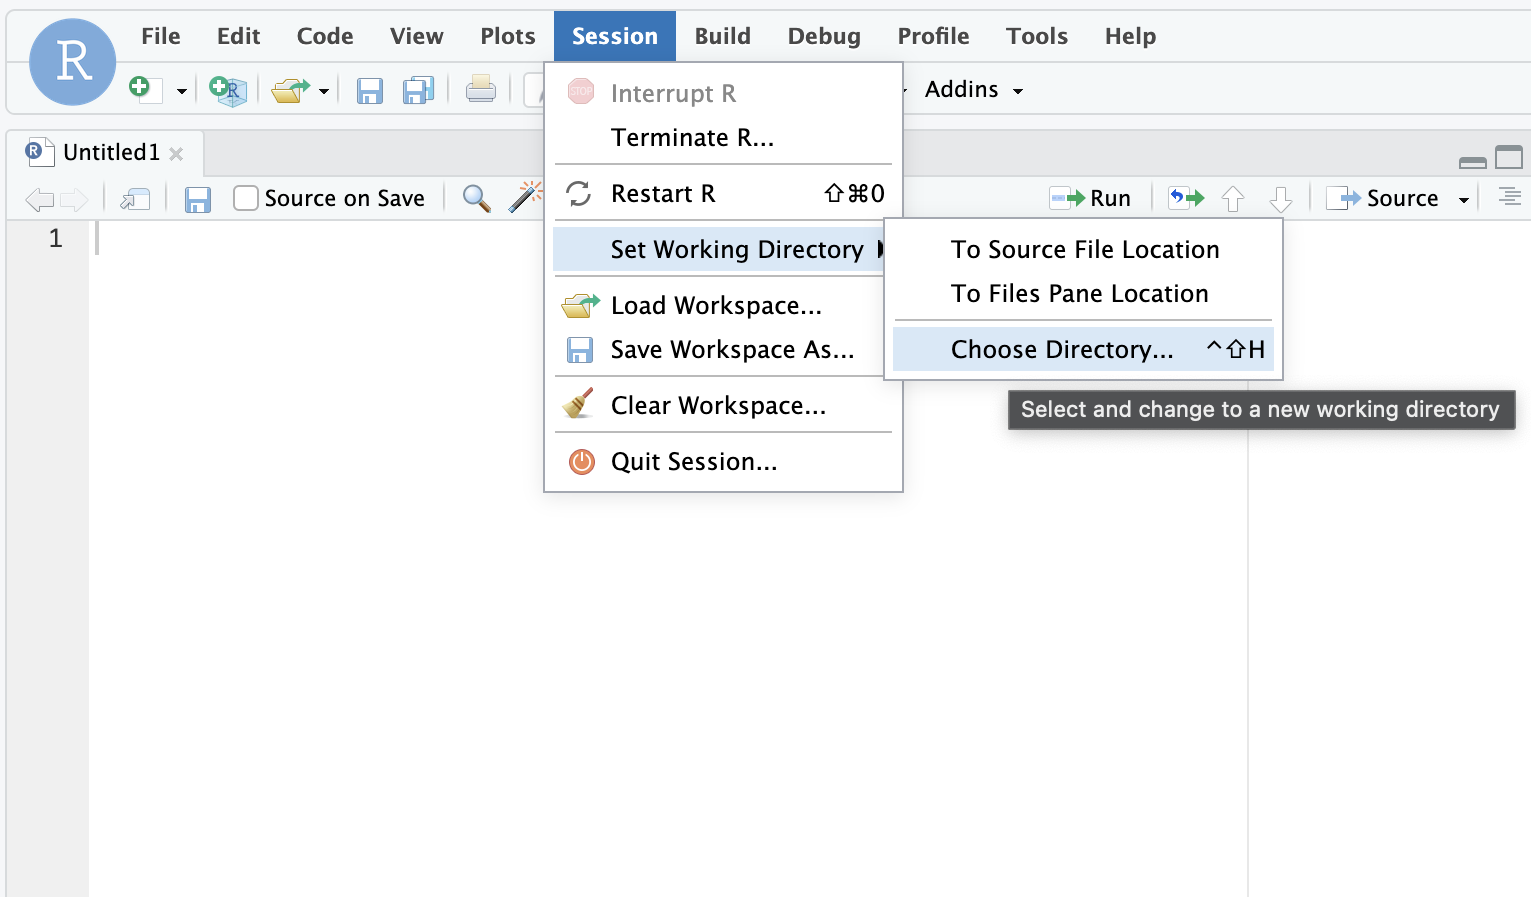
- Navigate to the folder containing the exercise files and click “Choose.”
Open the Test File:
- After setting the working directory, open the corresponding R test file located in the same chapter folder.
Run the Tests:
- To run the tests inside the R test file, click on the “Run Tests” button in the top-right corner of the script editor. This will execute the unit tests and provide feedback on your solutions.

- To run the tests inside the R test file, click on the “Run Tests” button in the top-right corner of the script editor. This will execute the unit tests and provide feedback on your solutions.
Review the Test Results:
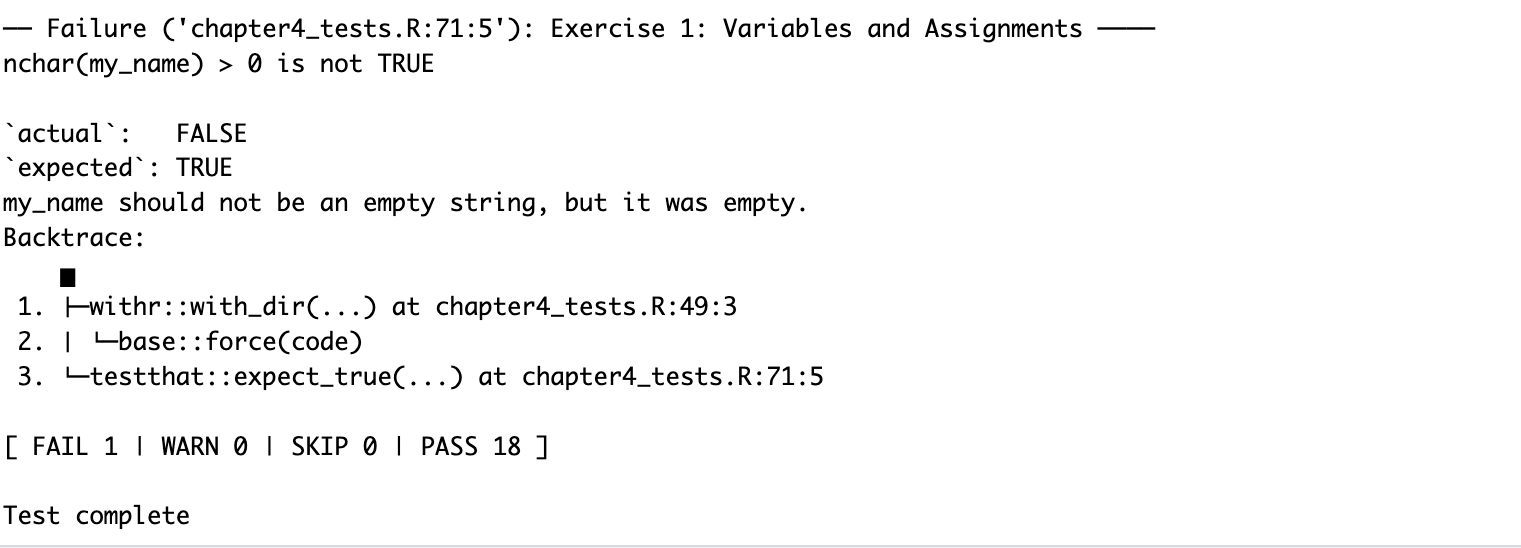
- The test results will be displayed in the R console, showing which tests passed or failed.
- Expected Output: If all tests pass, you’ll see a summary indicating success.

- Expected Errors: If any tests fail, the console will show which tests didn’t pass, along with error messages that provide details on the issue.
Troubleshooting:
Syntax Errors: Ensure your R code is syntactically correct (e.g., missing commas, unmatched parentheses).
Logical Errors: Double-check that your calculations or logic align with the problem requirements. In these cases, you will see an error message indicating the expected output and the actual output, or missing output.

Missing Variables or Functions: Make sure all necessary variables and functions are correctly defined and used. In these cases, the error message will indicate that the object or function is missing.

4.3.2 Optional: Autotests on MarkUs
For those who have access to MarkUs, you have the option to use it for autotests on your assignments. These autotests provide automated feedback to help ensure your solutions are correct.
- Submit Your Work:
From the list of assessments, select the chapter exercise you wish to submit. Go to the
Submissionssection. Click onSubmit Fileand then onChoose Filesto upload your Rmd file. Ensure that the files you submit match exactly the names listed in theRequired Filessection. If you prefer not to rename the files locally, you can use theRename file tooption, which will show you a list of files you need to submit. Choose the correct file name from this list for your upload.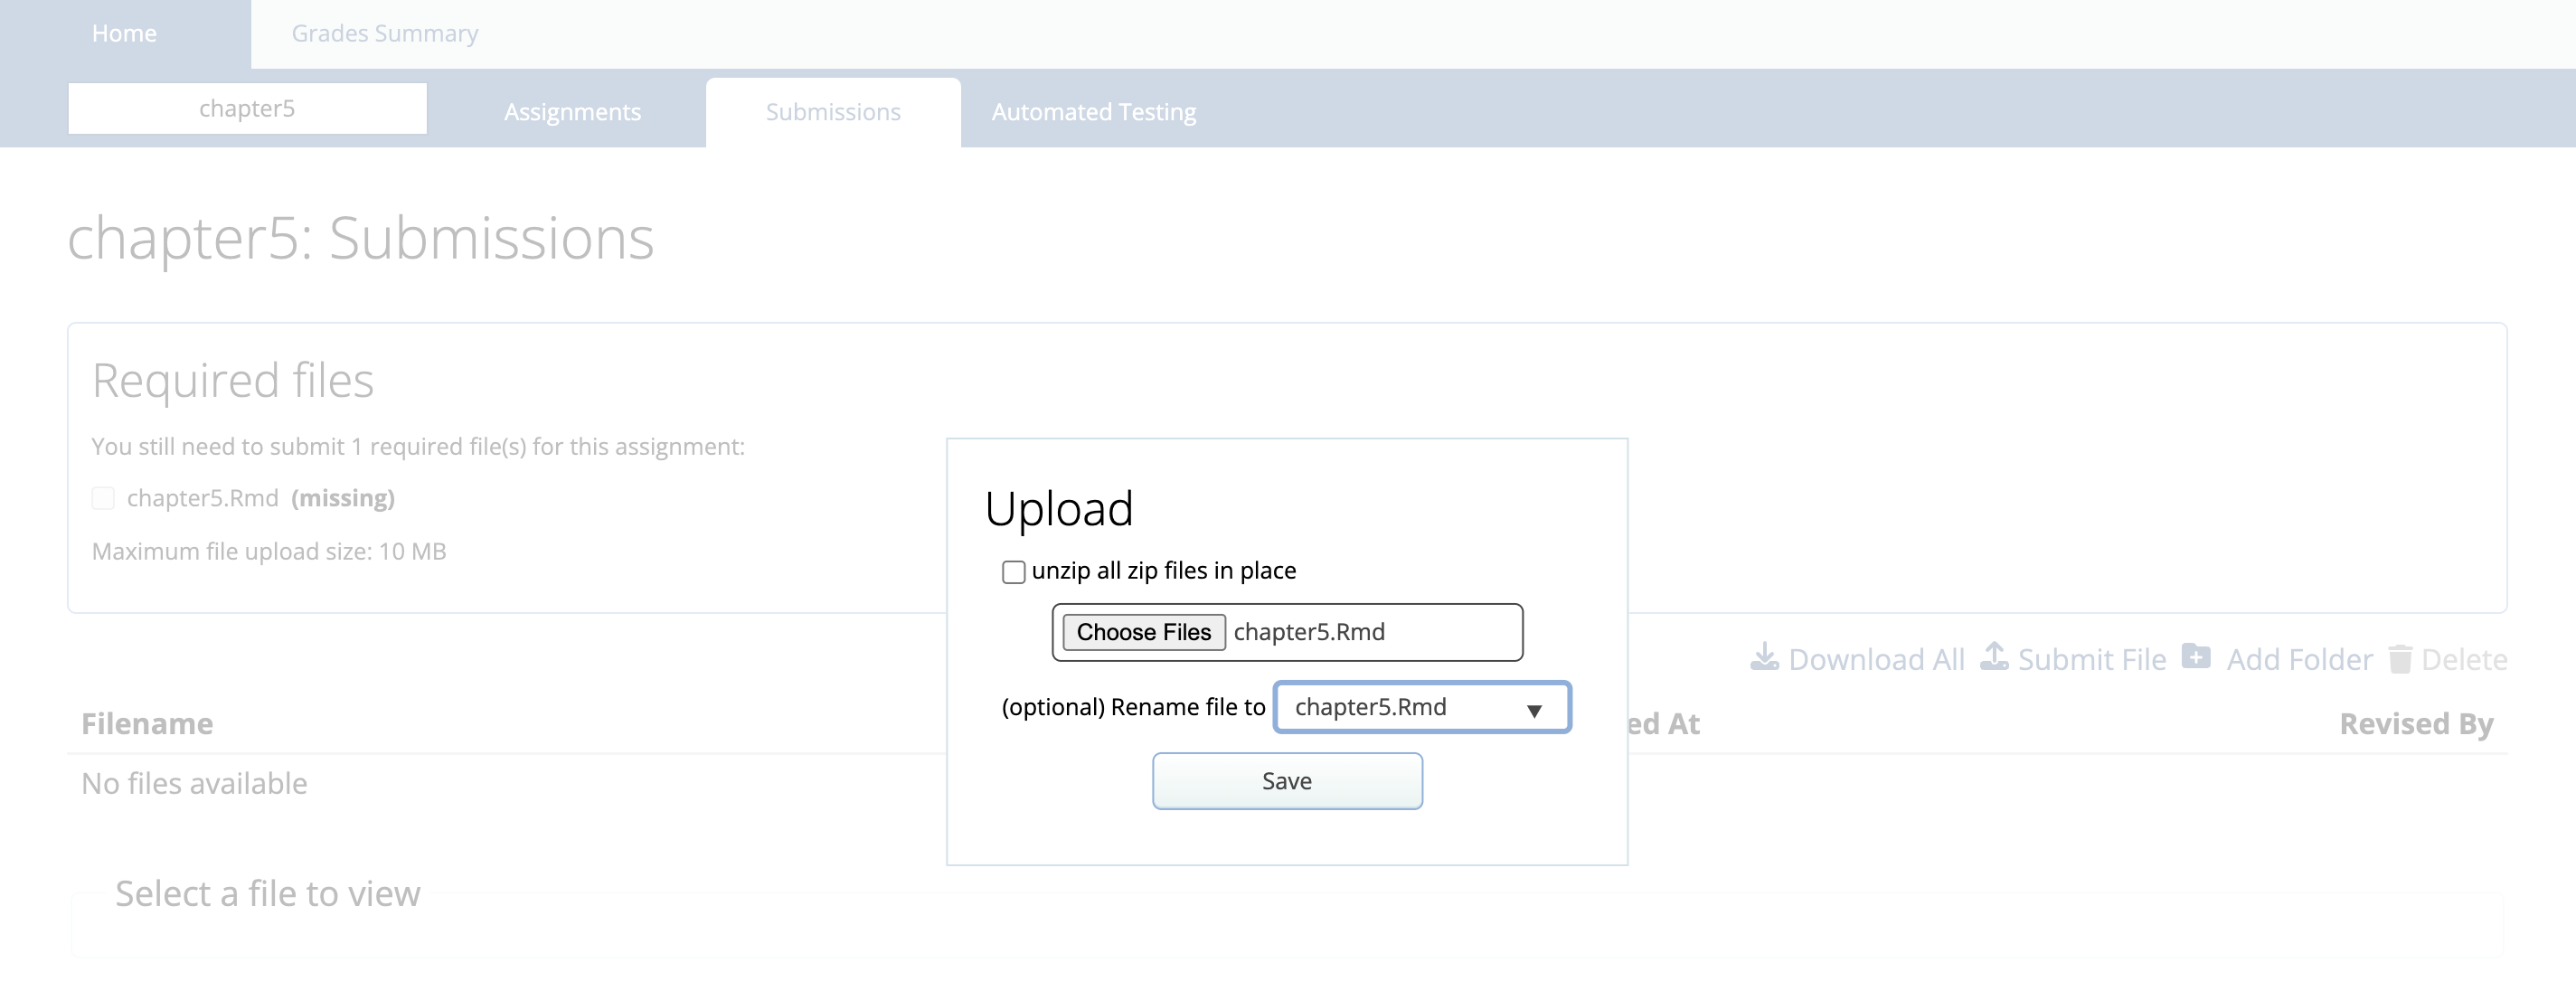
- Run Autotests:
- Go to the
Automated Testingsection and click onRun Tests. This will trigger the autotests to check your submission against the provided test cases.
- Go to the
- Review Feedback:
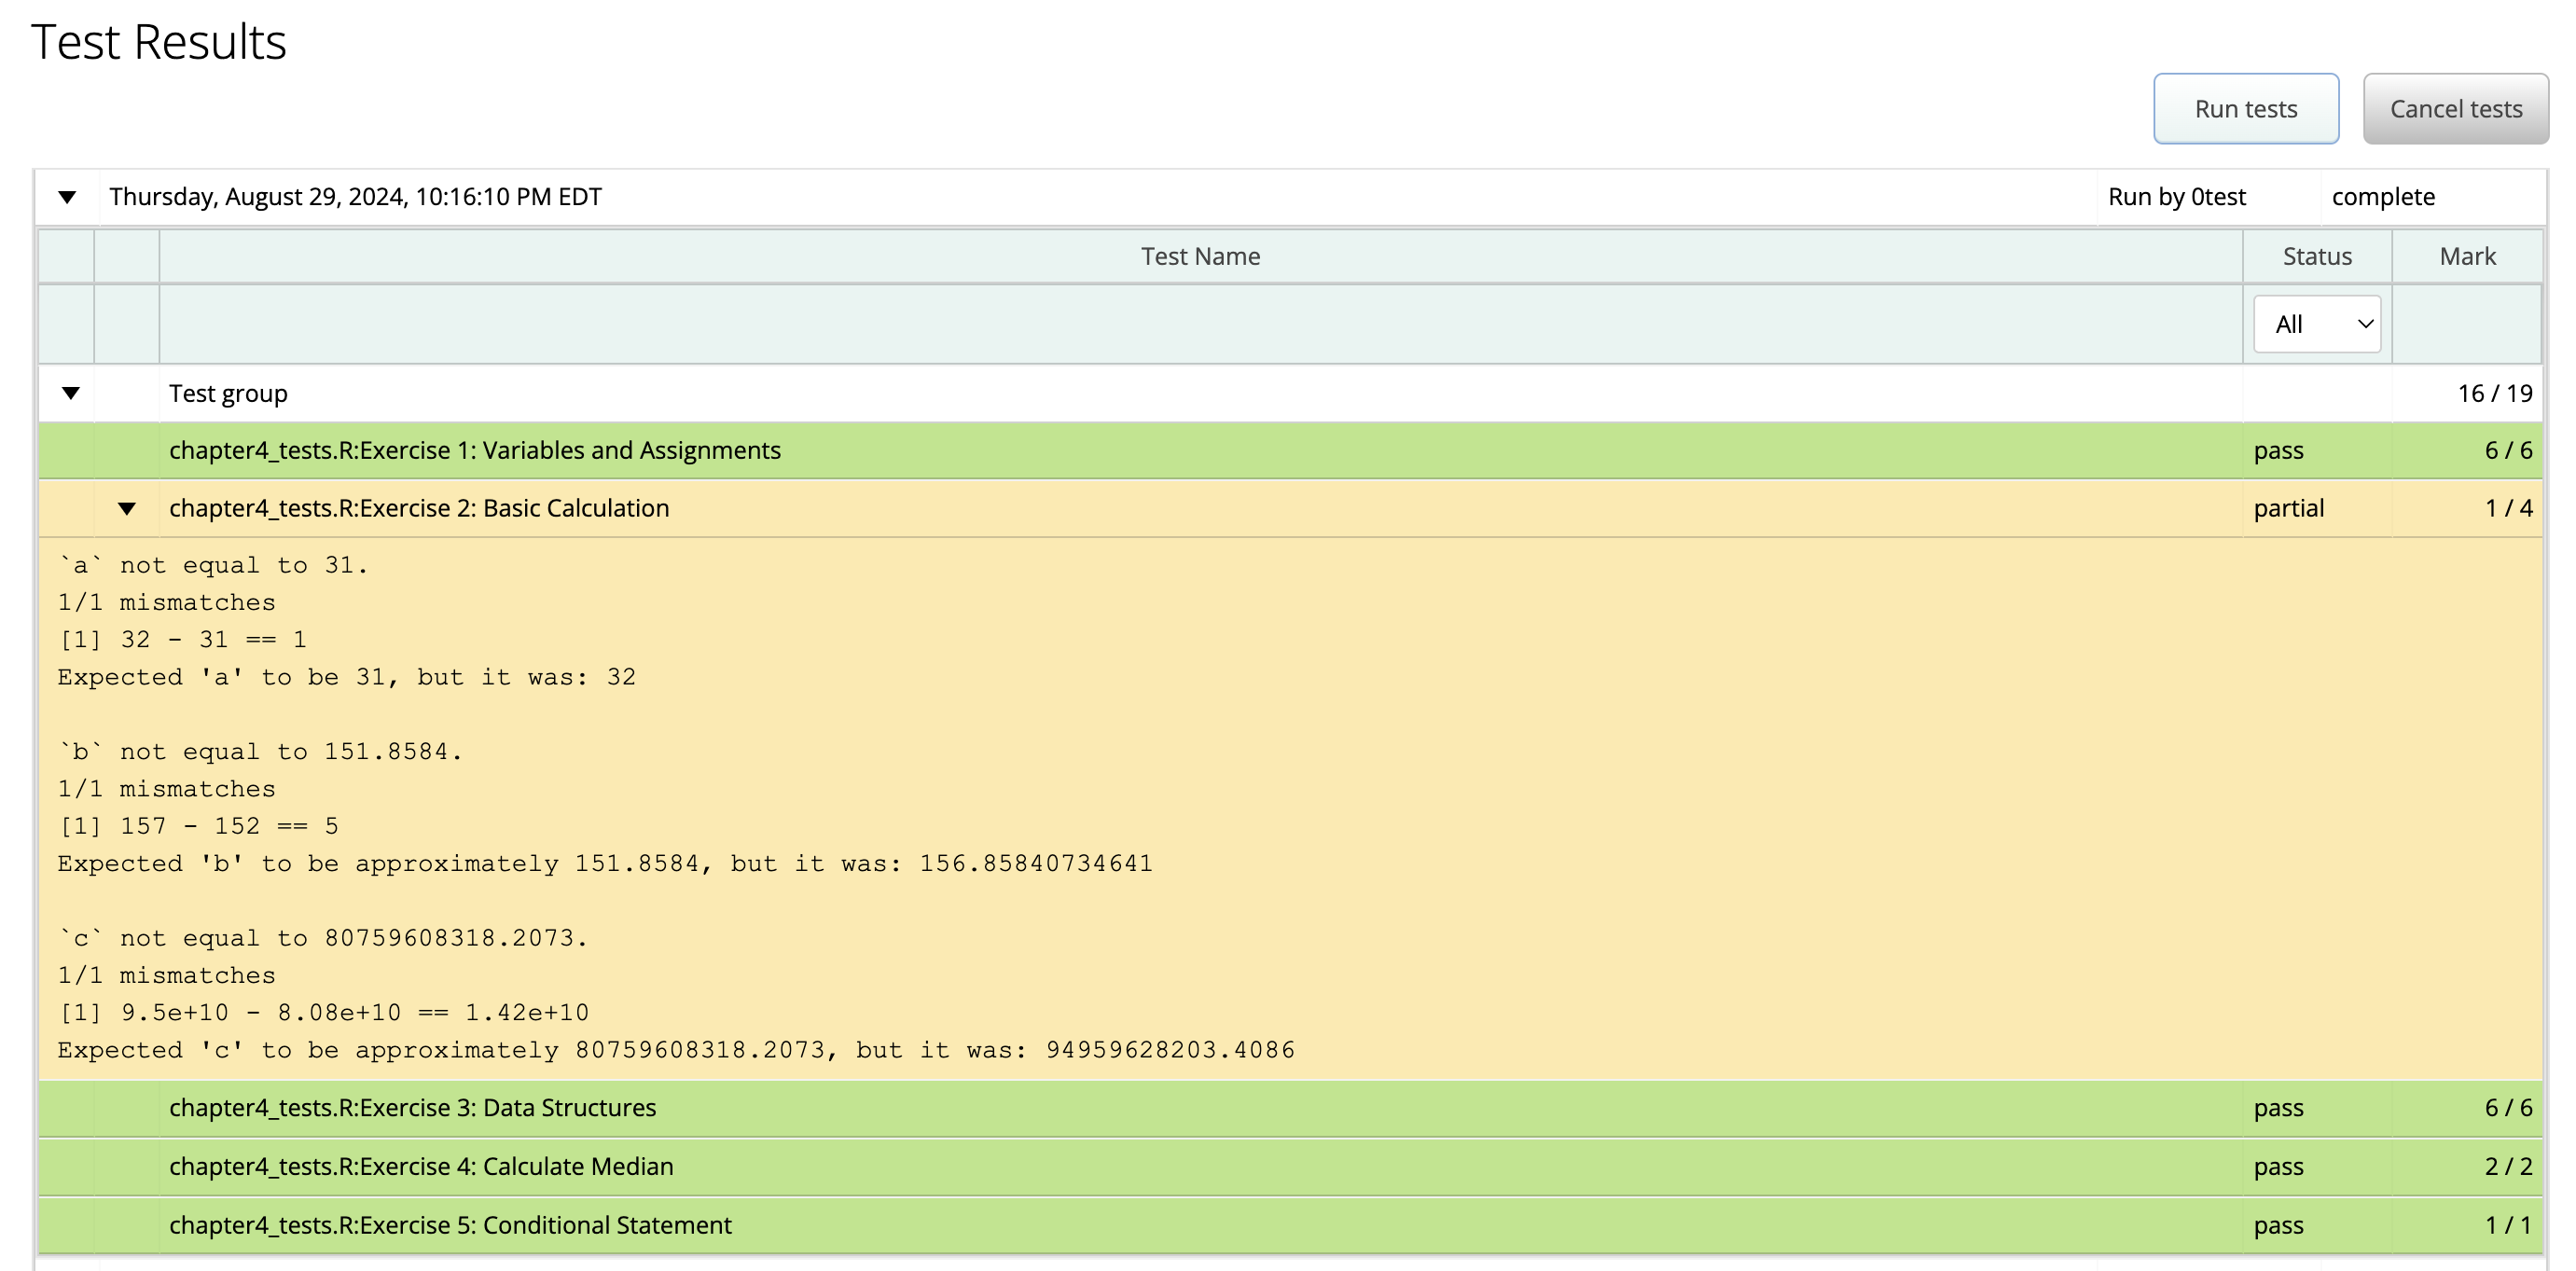
- MarkUs will provide immediate feedback on your submission, indicating which tests passed or failed. Examine this feedback to identify any issues.
- Resubmit if Necessary:
- If any autotests fail, revise your Rmd file based on the feedback and resubmit it for further testing.